General
The General settings define basic properties of the .FLY file including: project information, minimum required version of TerraExplorer, and startup message parameters. To implement any setting changes, you need to save and then reopen the project.
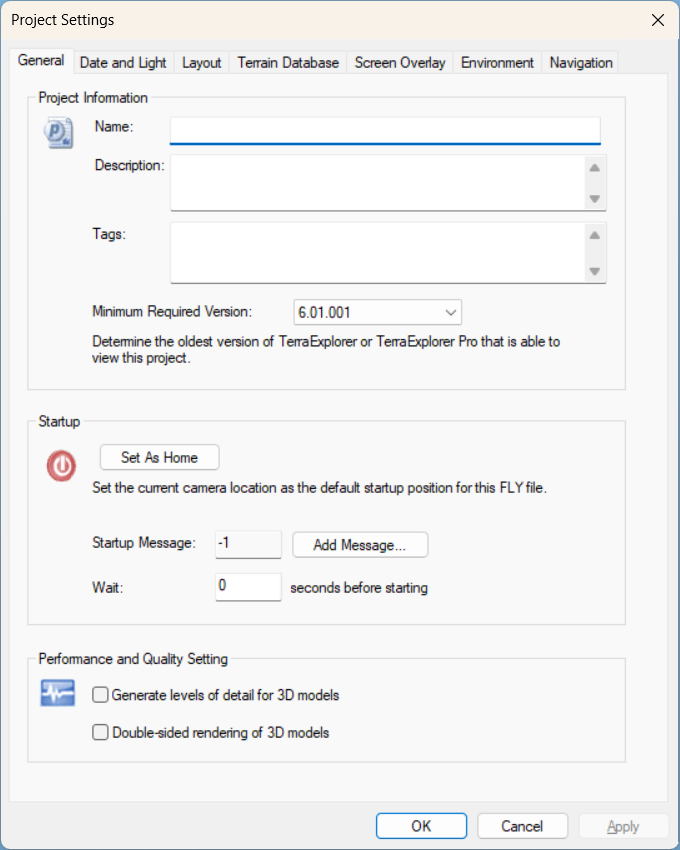
Project Settings - General Tab
|
Parameter |
Description |
|
Project Information |
|
|
Name |
Name of the project. |
|
Description |
Enter a text string. |
|
Tags |
Key words or terms associated with the project file. If adding multiple tags, they should be semicolon delimited. |
|
Minimum Required Version |
When TerraExplorer or TerraExplorer Pro opens a .FLY project, they compare this number to their own version number. If the minimum supported version is higher than the version of TerraExplorer currently trying to open the project, TerraExplorer forces an upgrade in order to open it. |
|
Startup |
|
|
Set As Home |
Click to set the current camera location as the default startup position for this .FLY file. |
|
Startup Message |
Determines the message to be shown when the project is opened. Click Add Message to open the Create Message dialog. See "Messages and Tooltips" in the "Working with Objects" chapter for further information on creating messages. |
|
Wait |
Set the number of seconds TerraExplorer waits at the beginning of the session before starting the Auto-Start procedure or allowing manual flight. It is recommended to use this feature for Internet applications where you want to freeze camera movement for several seconds at the beginning of the session. This freeze allows TerraExplorer to stream objects and features and sharpen the image before the session starts. The wait period can be overridden by selecting elements from the Project Tree. See "Setting the Auto-Start Procedure" in this chapter for further information on assigning elements for Auto-Start. |
|
Performance and Quality Setting |
|
|
Generate Levels of Detail for 3D Models |
Automatically optimize all loaded models by conversion to XPL2 upon loading. When a model file is converted to XPL, a set of XPL files is created from a single model file where each file contains data for one Level of Detail (LOD) only. TerraExplorer displays the best LOD file based on the viewer position in relation to the object. This results in an improvement in overall model display performance. Note: Generating Level of Detail is recommended for projects that have dense model layers, with non-optimized models (e.g., KML with DAE models). While objects may take slightly longer to load the first time, memory usage will be optimized. |
|
Double sided rendering of 3D models |
Select this check box to render the faces of 3D models from two sides. You should only use this option if you have 3D models in the project with single-side faces or non-unified normal, and you want to display them as double-sided. |
Setting the auto-start procedure
You can assign only one element for the Auto-Start procedure. The last element you assign is used. You must save the project for this setting to take effect.
You can assign any of the following elements for Auto-Start:
§ The camera’s current position.
§ Any location, presentation, or object.
At the beginning of the project, the camera starts at a specific location or performs a unique flight pattern according to the selected Auto-Start element.
|
Auto-Start Element |
Description |
|
Start Position |
The project starts with the camera in the Start Position coordinates. |
|
Location |
The auto-start procedure depends on the selected location’s Activation Action: § If the location’s Activation Action parameter is set to "Fly To", the project begins with the camera viewing the selected location. § If the location’s Activation Action parameter is set to one of the pattern flights, the project begins by flying in the selected pattern around the selected location. |
|
Presentation |
The project starts by playing the selected presentation. |
|
Object |
The auto-start procedure depends on the type of object and its Activation Action: § Static object with Activation Action parameter set to "Fly To" or one of the "View" actions - The project starts by flying from the Start Position to the selected object. If a specific "View" action is selected for the object, the camera stops at that view. § Static object with Activation Action parameter set to one of the pattern flights - The project starts by playing the pattern around the selected object. § Dynamic object with Activation Action parameter set to "Fly To" or one of the "View" actions - The project starts by flying from the Start Position to the selected object. If a specific "View" action was selected for the object, the camera stops at that view. If the "Fly To" action is selected, then the camera stops behind and above the object. After the camera reaches the object, it starts to follow it. § Dynamic object with Activation Action parameter set to one of the pattern flights - The project starts by playing the pattern around the selected object, while the object is moving. |
How to assign an element for auto-start
To set the camera’s current position as the Start Position of the project (shortcut - F2):
1. On the Home tab, in the Project group, click Project Settings.
2. In the General tab, in the Startup section, click Set As Home.
3. If another location, object, or presentation had previously been set for Auto Start, a dialog displays confirming that you want to replace the previous element with the current location. Click Yes to replace it, or No to cancel.
To assign an element (location, presentation, or object) as the Start Position of the project:
§ In the Project Tree, right-click the element and from the shortcut menu select: Set Location for Auto-Start, Set Presentation for Auto-Start or Set Object for Auto-Start.
Note: The name of the Auto Start element in the Project Tree is underlined in red. For example, an "Auto-Start" location is marked: 
To set a waiting time at the beginning of the session before the system performs the Auto-Start procedure:
1. On the Home tab, in the Project group, click Project Settings.
2. In the Startup section, in the Wait field, type the number of seconds the system should wait before the Auto-Start.